Apple Pierogi Recipe
These apple pierogi are a delightful fusion of sweet and savory, offering a delicious twist on the classic dumpling. Filled with cinnamon-spiced apples and encased in tender dough, they make for a perfect dinner for kids and adults alike.

These apple pierogi, crafted from everyday ingredients, are delightfully simple to make. With apples available year-round, you can enjoy these whenever the craving hits.
The caveat, typical of all pierogi recipes, is that they require a bit of time – about 90 minutes. So, while they may not be your usual quick weeknight meal, they make for an enjoyable weekend cooking project.
If you’re pressed for time, my 30-minute ‘lazy pierogi’ recipe offers a quicker alternative.
Personally, I prefer making these pierogi on weekends, often preparing a double batch. This strategy ensures a stash of these delicious dumplings for quick meals during the week, or even a unique breakfast treat.
If you’re making these apple pierogi for the first time, read the ingredients notes, step-by-step instructions, and tips. If you’re a veteran, feel free to jump to the recipe card.
First time making pierogi? Check out our guide to homemade pierogi to learn everything you need to know about the process.
Ingredients Notes and Substitutes

- Pierogi dough. For these apple pierogi, start with a portion of my best pierogi dough recipe. But don’t hesitate to use another recipe if you already have a favorite. The key is to ensure you have about two cups of flour for enough dough to accommodate all the filling.
- Apples. A blend of sweet and tart apples usually hits the spot, but use what you have on hand. We’ll be fine-tuning the flavor with sugar, cinnamon, and lemon juice.
- Sugar. While I lean towards white sugar, you can certainly use brown sugar or any other alternative. Just note that the choice of sugar will subtly affect the final taste.
- Cinnamon. Like a silent rule, apples and cinnamon go hand in hand, and this recipe is no exception.
- Lemon juice (optional). If your apples are on the sweet side, a dash of lemon juice can balance the flavor. No lemon juice? White vinegar or apple cider vinegar can serve as good stand-ins but use half the amount.
Step-By-Step Instructions
- Prepare the dough. Use my best pierogi dough recipe, or go with your favorite one. Since I recommend letting the dough rest for 30 minutes before using, it’s best to start by preparing it.

- Prep the apples. Wash, peel, and core the apples, then dice them into small to medium pieces. Perfect for our pierogi filling!

- Cook the apples. Over medium-low heat in a non-stick skillet, cook the diced apples for about 10 minutes, stirring often. No fat or seasonings at this point. This softens the apples and enhances the flavor. The volume should reduce noticeably. If using a regular pan, stir continuously to avoid burning.

- Season to taste. Sprinkle in the cinnamon and sugar. If your apples are more on the sweet side, a dash of lemon juice can work wonders. Stir it up and taste. Feel free to add more cinnamon, sugar, or acid to your liking. Make sure you love the flavor before going forward.

- Divide the pierogi dough into two or three parts. Take one part and spread it on a floured work surface, then roll it out until it’s nice and thin. Be careful not to roll it too thin, as it may tear when you form the pockets and seal the dough around the filling. Wrap the rest of the dough tightly to prevent it from drying out.

- Cut palm-sized circles in the rolled pierogi dough. Anything round with a somewhat sharp edge is great, but a simple glass or mason jar works as well. Or use your pierogi maker if you have one. Form a ball with the dough left over after cutting and use it when rolling out the rest of the pierogi.

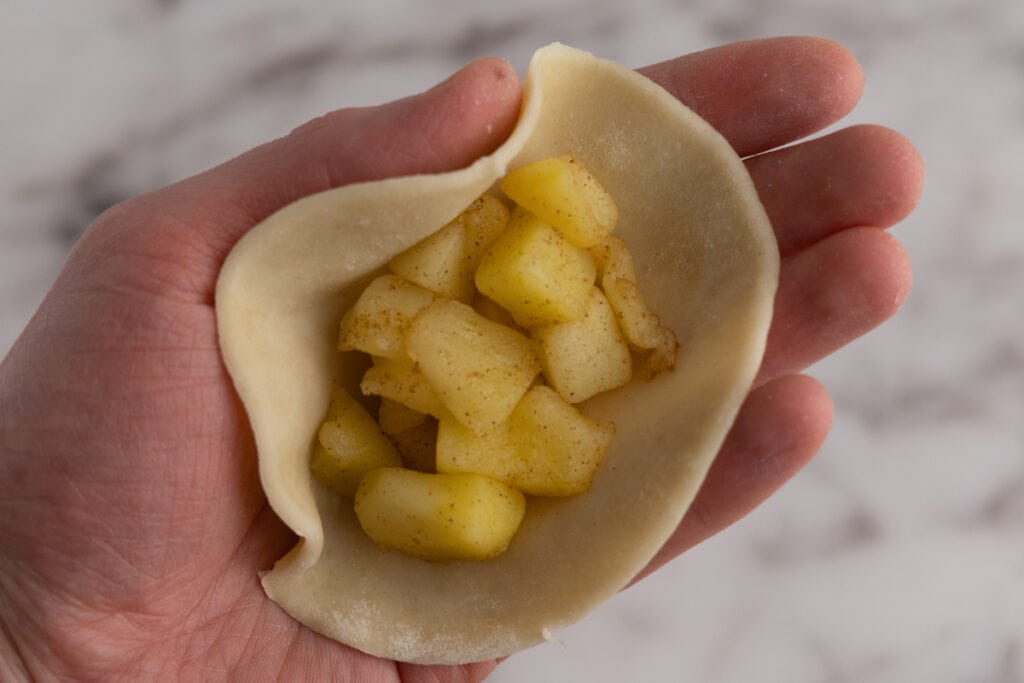
- Place a spoonful of the filling in the middle of the dough circle, then fold the dough over the filling and press the edges together starting in the middle. Try to leave as little air as possible in the pocket you’re forming. To make a good seal, moisten the outer edge of the dough using a wet finger before pressing the edges together.
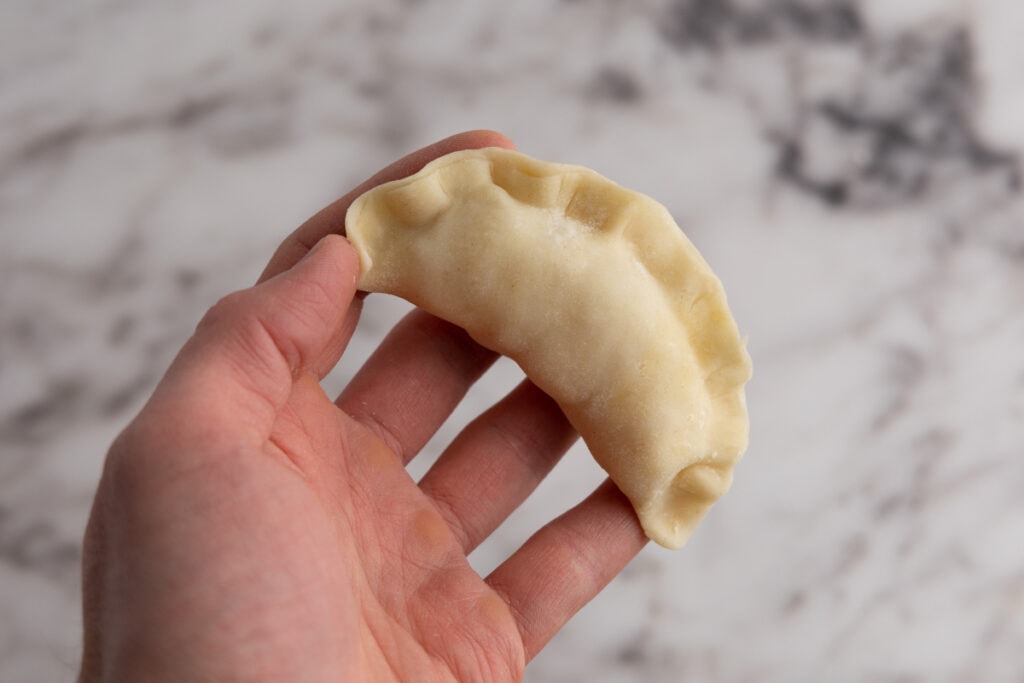 Hand-formed pierogi usually aren’t as pretty as machine-made
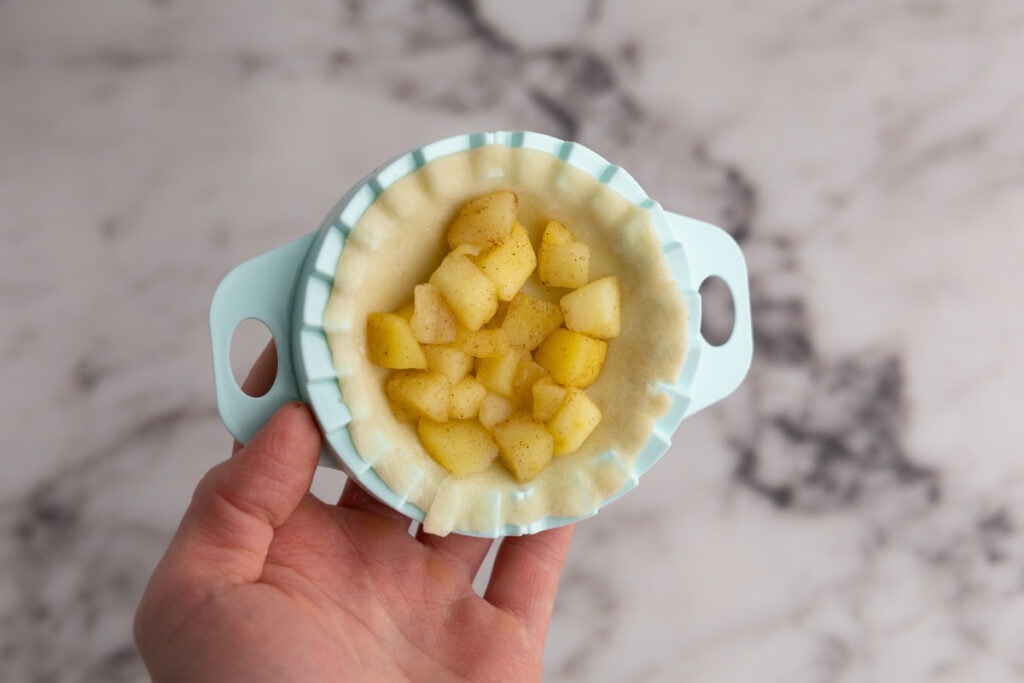 Using a pierogi maker
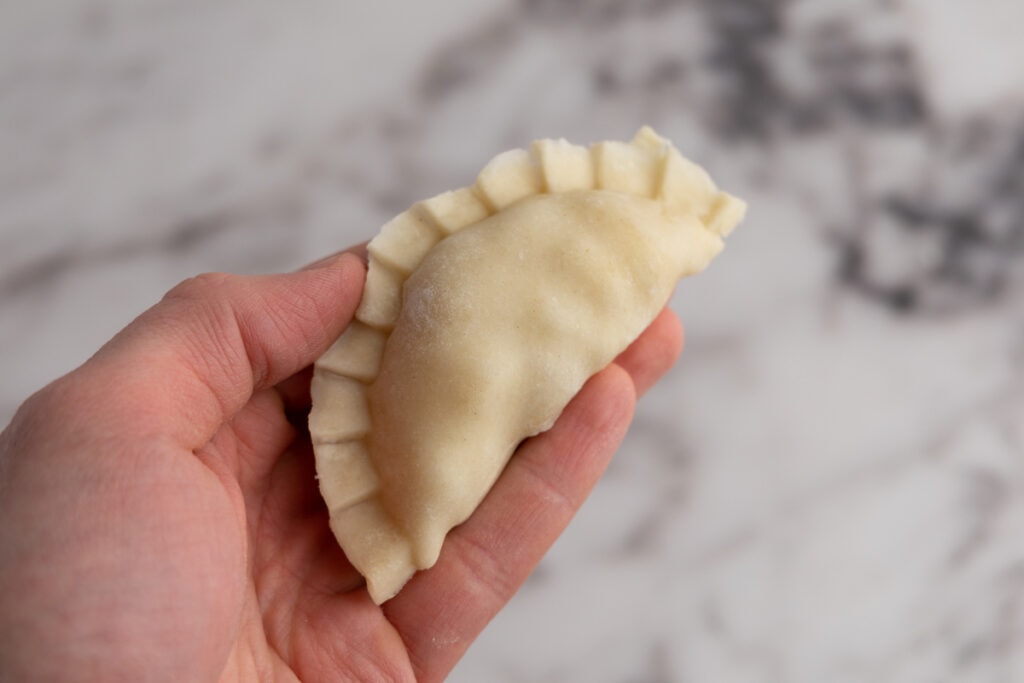 Makes better-looking pierogi


- Place each formed pierogi on a floured cookie sheet and cover them with a damp kitchen towel. The edges will dry out quickly otherwise. If you want to save space and let the pierogi touch each other, lightly brush the areas where they’ll touch with flour. This will prevent them from sticking together and causing the pierogi dough to tear when removed for boiling.

- Continue forming pierogi until you run out of dough or filling.
- Bring a large pot of salted water to a boil. I typically use one teaspoon of salt per quart of water but feel free to adjust the amount to your preferences.
- Once the water is boiling, add a few pierogi to the pot and stir them to prevent them from sticking to the bottom. Once the pierogi start floating to the surface, simmer them gently for another 3 to 4 minutes. If the apple pierogi float to the surface right away, simmer for 4 to 5 minutes. Make sure not to overcrowd the pot so that the pierogi don’t stick together or cook unevenly.

- Remove the pierogi from the water using a slotted spoon and serve.

Recipe Tips
- Taste Test the Apple Filling. The key to delicious pierogi lies in ensuring the filling is flavorful before it even meets the dough. Depending on your apples and sweet-to-tart preference, you may want to tweak the sugar amount or add an extra squeeze of lemon juice. Once the apples are cooked, mix in the spices as per the recipe, then taste test and add sugar or lemon juice as needed. Keep in mind how you’re going to serve these – if you’re going to use a sweet syrup, leave the apples on the tart side. By the way, this apple filling works great in Polish apple cake.
- More Pierogi, More Joy. If you’re up for it, consider making a larger batch by doubling up on the dough and filling. You can also experiment with different pierogi fillings for half the batch to save time. Why not try spinach pierogi or lentil pierogi for a vegan twist?
- Pan-Fry for Extra Flavor. After boiling, give the pierogi a quick pan-fry until lightly browned on both sides. The extra flavor and texture can be a game-changer.
- Patience Pays Off. As with most good things, these pierogi taste even better the day after cooking. Talk about a tempting reason to make extras.
- Keep Water Handy While Forming Pierogi. A small bowl of water at your workstation can be a lifesaver, allowing you to easily moisten the dough’s outer edge and form perfect pockets.
- Leftover Dough or Filling? It’s normal to end up with leftover dough or filling, as exact quantities can vary. If there’s a lot of leftover dough, stash it in the freezer for next time. Just a little dough left? Feel free to toss it. As for the leftover filling, I recommend freezing it for your next pierogi adventure.
- Timing. Start boiling the water after using about half the filling, and begin cooking the pierogi as soon as the water is boiling. Gently place a few pierogi into the pot, give them a stir, then continue with your dough rolling and pocket-forming. Keep an eye on the cooking pierogi, checking every minute or so. This way, you’re cooking and preparing simultaneously, saving some time.

How to Serve Apple Pierogi
Let’s talk about what you can pair with these fruity little pillows of deliciousness to bring out their full flavor and create a complete dish. Here we go:
- Enjoy them as they are. If you’ve nailed the balance in your apple filling, and it doesn’t need additional sweetness or acidity, you can confidently serve your pierogi in their pure form. This approach is my personal favorite, as it allows the apple filling to truly shine.
- With sour cream and powdered sugar. It’s a classic for a reason. The creamy tang of the sour cream and the sweet dusting of powdered sugar beautifully balance the tartness of the apples in your pierogi. This is a tried-and-true combo that never fails to delight. Plus, it takes less than a minute to grab that container of sour cream and bag of dusting sugar and top the pierogi.
- With a scoop of ice cream. Want to turn your pierogi into a full-on dessert? Well, top it off with a scoop of vanilla ice cream. As it melts, it’ll mingle with the apples to create a mouthwateringly sweet sauce. If you’re feeling adventurous, give cinnamon or caramel ice cream a try!
- Drizzle with your choice of syrup or sweet sauce. Much like a stack of pancakes, apple pierogi are a canvas for a wide range of sweet toppings. Honey, maple syrup, jam, or even a fruit syrup such as blueberry or strawberry can elevate your dish to new heights. If you’re going this route, aim for a more tart apple filling to balance the sweetness of your chosen topping.
(If you’re looking for more topping options, check our guide to top pierogi sauces and toppings.)
Do you have a favorite way to enjoy apple pierogi? Join the conversation below and share your unique pairing, inspiring others and possibly discovering a new favorite yourself!

Storage
If you want to store your apple pierogi, let them chill out and dry solo on big plates.
Give them a good 15 to 20-minute rest, then flip them over, making sure both sides get a fair chance to dry up nicely. When they’re ready, shuttle them into a sealed container, keeping them in a solo row and trying not to let them snuggle too close to each other (a little bit of contact is fine) to prevent them from becoming conjoined twins.
Got a bunch of pierogi and need to pile them up? No worries! Just use some parchment paper or cling film as a barrier between each layer.
If you’ve cooked up a storm and have leftovers, you can always freeze your pierogi and enjoy them later.

Reheat
Alright, let’s get those apple pierogi nice and toasty again! First, grab a non-stick skillet and set it over a medium-low flame. Toss in a couple of spoonfuls of neutral oil (or butter) to give the skillet a light coating.
Once the skillet’s all warmed up, it’s pierogi time! Gently place the pierogi in the skillet, giving each one some space to breathe. You don’t want a pierogi pile-up in there.
Next up, pop a lid on and let them cook away for about 12 to 15 minutes. Remember to flip them halfway so they warm up evenly.
Keep the pierogi on their toes by giving the skillet a little jiggle every few minutes. This will keep them from playing ‘stick-the-pan’.
Fancy a crispier bite? Crank up the heat a smidge, or let the pierogi hang out in the skillet a bit longer and only flip them once one side’s got a nice tan. There you have it, reheated apple pierogi as good as new!
Apple Pierogi

Ingredients
- 1 batch pierogi dough
- 4 apples ~900g
- ¼ teaspoon cinnamon or more to taste
- 1 teaspoon sugar or more to taste
- 1 teaspoon lemon juice optional
- salt for boiling
Instructions
- Prepare pierogi dough of choice and let rest for 30 minutes.
- Peel, core, and dice apples into small pieces.
- Cook diced apples in a non-stick skillet over medium-low heat for about 10 minutes, stirring often.
- Season apples with cinnamon, sugar, and a dash of lemon juice if needed. Adjust to taste.
- Divide dough into 2-3 parts. Roll one part thin on a floured surface, but not so thin that it tears. Wrap remaining dough to prevent drying.
- Cut palm-sized circles in the rolled dough. Reuse the leftover dough by forming a ball and rolling again.
- Place a spoonful of apple filling on each dough circle, fold over, and seal edges, removing as much air as possible. Moisten edges for a better seal. Place formed pierogi on a floured sheet, covered with a damp kitchen towel. Use flour to prevent sticking if they touch. Repeat until all dough or filling is used.
- Boil a large pot of salted water (1 tsp salt per quart).
- Add pierogi to boiling water, stirring to prevent sticking. Simmer gently for 3-4 minutes after they float to the surface.
- Remove with a slotted spoon and serve.
Hungry for More?
If you got this far, I guess you’re into pierogi making. Here are a couple of other pierogi recipes worth considering:
- Blueberry Pierogi. Looking for another dessert pierogi option? These are easy to make and work with both fresh and frozen blueberries.
- Strawberry Pierogi. Another sweet pierogi option that works well with both fresh and frozen berries.
- Plum pierogi. Plums pierogi are even easier to make than apple-flavored pierogi. If you’ve got a bunch of plums on hand, give it a go!
- Farmer’s Cheese Pierogi. These are as simple to make as they get and are another great choice if you’re looking for sweet pierogi.
- Spinach Pierogi. These are great if you want to squeeze in more greens or love garlicky spinach.
- Asparagus Pierogi. If it’s asparagus season, definitely give these a try.
- Lentil Pierogi. For all the vegans out there, these pierogi are pretty great and super simple to make.


![Best Pierogi Dough [No Eggs, Vegan]](https://definitelynotachef.com/wp-content/uploads/2023/03/Best-pierogi-dough-thumb.webp)